Key Ingredients and Essential Tools for Baking Perfect Croissants
Choose High-Quality Ingredients for Authentic Croissant Flavor
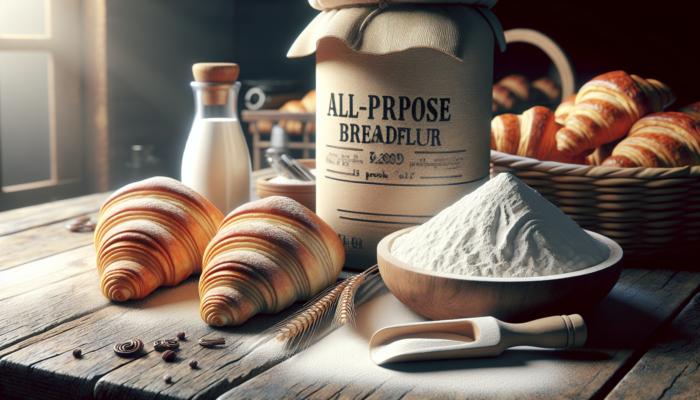
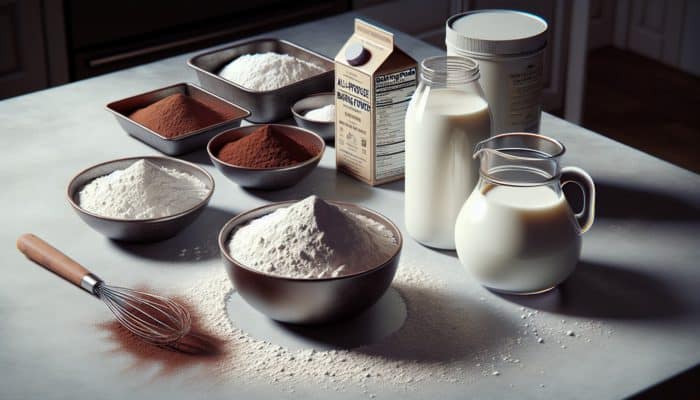
Embarking on your exciting journey of creating flaky croissants at home requires starting with the highest quality ingredients. Authentic croissants necessitate the use of superior products that significantly enhance their flavor and texture. Begin by selecting premium all-purpose flour or bread flour, as these options provide the necessary gluten structure essential for proper rising. The flour you choose plays a pivotal role in determining the croissant's texture; always opt for a brand that is renowned for its high protein content to ensure successful baking outcomes.
The next crucial ingredient is unsalted butter. You will need a generous amount, ideally European-style butter, which has a higher fat content, making it perfect for creating those irresistible layers. This type of butter is essential for achieving the delightful flakiness that croissants are famous for. In addition, yeast—preferably active dry yeast or instant yeast—is vital for allowing the dough to rise, contributing to the airy lightness that defines croissants. Don't forget to include milk, which adds moisture to the dough, while sugar and salt enhance the overall flavor profile.
Lukewarm water is also necessary to effectively activate the yeast. These ingredients form the crucial backbone of your croissants, and sourcing high-quality options can elevate your baking experience, ensuring your croissants turn out nothing short of extraordinary.
Essential Baking Tools for Crafting Perfect Croissants
Creating croissants requires not only the right ingredients but also essential tools. A reliable rolling pin is indispensable for achieving an even dough thickness, which is vital for the lamination process. While a traditional rolling pin works adequately, investing in a French tapered rolling pin can provide enhanced control and precision during the rolling process, allowing for superior results in your baking endeavors.
A dough sheeter can be a fantastic investment for serious croissant bakers. This machine rolls the dough to a consistent thickness, saving time and ensuring perfect layers. However, if a sheeter isn’t available, your trusty rolling pin will still suffice for achieving excellent results in your croissant-making journey.
Additionally, you will require a sharp knife or dough cutter to accurately cut triangles, as well as a band and parchment paper for easy transfers. A ruler can help ensure uniformity in your triangles, leading to evenly shaped croissants. A silicone pastry mat is also a valuable tool, as it prevents the dough from sticking and simplifies the clean-up process after your baking session.
Creative Ingredient Substitutions for Delicious Croissants
Sometimes, sourcing every ingredient can prove challenging. Fortunately, effective substitutions can come to the rescue. If you find yourself without all-purpose flour, you can create a nutritious blend by combining whole wheat flour with all-purpose flour. When it comes to butter, margarine can serve as a substitute; however, be aware that it may slightly alter the flavor and texture of your croissants.
For those who are lactose intolerant or prefer a vegan option, coconut oil can serve as a dairy-free alternative to butter. However, keep in mind that the unique flavor profile of croissants is largely attributed to butter, so choose this substitute with care to ensure a delightful outcome. If you don't have active dry yeast on hand, you can easily use instant yeast without needing to adjust your recipe, making it a convenient alternative in your baking.
Plant-based options like almond or soy milk can work excellently in place of milk, but it’s advisable to opt for unsweetened varieties to avoid altering the flavor. Sugar can be replaced with honey or maple syrup, although this may slightly influence the dough’s texture. Always consider the characteristics of the substitutes you select; they must complement the croissant-making process without hindering it, ensuring a successful baking experience.
Comprehensive Step-by-Step Guide for Preparing Croissant Dough

Carefully Mixing Ingredients to Create Croissant Dough
Your adventure in making flaky croissants at home begins with the meticulous mixing of the dough. Start by taking a large mixing bowl and combining your dry ingredients: flour, sugar, and salt. These components form the essential foundation for your croissant dough. It is crucial to whisk them thoroughly to ensure they are evenly distributed throughout the mixture, setting the stage for a uniform final product that will delight your taste buds.
In a separate bowl, activate your yeast by mixing it with lukewarm water and a pinch of sugar. Allow this mixture to sit for about 5 to 10 minutes or until it becomes frothy—this indicates that the yeast is alive and ready to perform its magic in your dough. Once activated, incorporate this yeast mixture into your dry ingredients along with milk. Mix the ingredients gently until they are thoroughly combined; be cautious not to overwork the dough at this stage, as it could adversely affect the final texture of your croissants.
Once the dough comes together, transfer it to a floured surface. Knead it gently for around 5-10 minutes until it achieves a smooth and elastic consistency. The objective is to develop gluten without overworking the dough since excessive handling can toughen it. A well-mixed dough will provide the necessary structure for the iconic layers that define croissants, resulting in a flaky and delicious pastry that you will be proud to serve.
The First Rise: Allowing Your Dough to Expand and Develop Flavor
After mixing your dough, the first rise is a crucial step in making flaky croissants at home. Shape your kneaded dough into a ball and place it in a lightly greased bowl, covering it with a damp cloth or plastic wrap. This covering keeps the dough moist and prevents it from forming a crust, which is essential for a good rise during this important phase.
Allow the dough to rise in a warm, draft-free area for about 1 to 1.5 hours or until it doubles in size. If you're in a cooler climate, consider placing the bowl in a slightly warmed oven (turn it on for just a few minutes and then turn it off) to create a warm environment conducive to rising. This essential period allows the yeast to work its magic, producing carbon dioxide that leavens the dough and imparts a light texture to your croissants, making them irresistible to anyone who tries them.
To test if the dough is ready, gently press your finger into it; if the indentation remains, it’s time to move on to the next stage. Patience is crucial during this phase, as it sets the foundational texture for your croissants, ensuring they will be light, airy, and absolutely delightful once baked.
Chilling the Dough for Optimal Baking Results and Flakiness
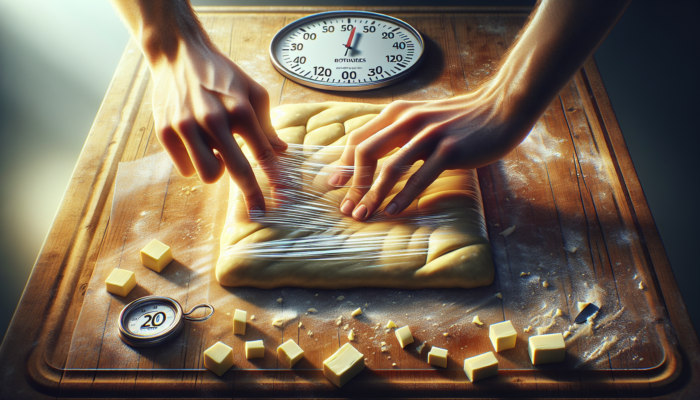
Chilling the dough is a critical step that should not be overlooked when mastering making flaky croissants at home. After the first rise, gently punch down the dough to release any trapped air. Shape the dough into a rectangle and wrap it tightly in plastic wrap. Refrigerate it for 30 minutes to an hour to allow the butter to firm up, which is essential for the subsequent steps in your croissant-making process.
Chilling serves two vital purposes. Firstly, it firms up the butter, making it easier to incorporate into the dough during the lamination process. Cold butter is paramount for creating those signature layers; if the butter becomes too soft, it will blend into the dough instead of creating distinct layers that result in a flaky texture. This critical step ensures that your croissants will rise beautifully and have that coveted flaky appearance.
Secondly, chilling the dough relaxes the gluten, making it easier to roll out in subsequent steps. This results in a more manageable dough that won’t spring back as you attempt to roll it out. Remember, investing the time to chill your dough will yield beautifully flaky croissants worth all the effort and patience you've put into the process.
Mastering the Art of Lamination for Flaky Croissants
Rolling Out the Dough for Perfectly Layered Croissants
Once your dough is sufficiently chilled, it’s time to embark on the essential lamination process, a crucial aspect of making flaky croissants at home. Begin by lightly flouring your work surface and rolling pin. Roll out your chilled dough into a large rectangle, targeting a thickness of about 1/4 inch to ensure even layers throughout the dough.
The objective is to achieve a consistent thickness throughout the dough, as uneven rolling can lead to inconsistent layers in your croissants. Keep your rolling pin moving in one direction, applying gentle pressure to avoid tearing the dough. If you encounter sticking, sprinkle more flour on your work surface or the dough to maintain smoothness and prevent frustration during the rolling process.
Once you’ve achieved your desired size, it’s time to incorporate the butter. Ensure that your butter is also chilled and cut into thin slabs to allow for even distribution. Position the butter in the center of your rolled-out dough, then fold the sides over to encase the butter completely. This step is critical; the butter must be fully sealed within the dough to create those coveted flaky layers during the baking process.
Effectively Incorporating Butter for Light, Flaky Croissant Layers
Successfully incorporating butter into the dough is the secret to achieving perfectly flaky croissants that everyone loves. After encasing the butter, gently roll the dough into a rectangle. This process, known as lamination, is essential for creating air pockets within the dough that contribute to its flakiness and overall texture.
It’s crucial that the butter remains cold throughout this process—if it begins to soften too much, you risk having the butter seep out from the layers. Work quickly and efficiently, rolling to the edges to ensure even distribution of the butter throughout the dough, setting yourself up for success in achieving those signature flaky layers.
After rolling, fold the dough into thirds, similar to how you would fold a letter. This technique is referred to as a single fold and is essential for layering, which will be repeated multiple times in your croissant preparation. After each fold, wrap the dough in plastic and place it back in the refrigerator for at least 30 minutes. This resting period allows the gluten to relax again, making it easier to roll out for the next stages of the process.
Repeating the rolling and folding process two more times will develop the layers further, but if you’re feeling particularly ambitious, you can continue for an even flakier result. The more folds you execute, the flakier your croissants will turn out, so don’t hesitate to push the envelope and experiment with your technique!
Perfecting Folding Techniques for Achieving Exceptional Flakiness
Mastering the folding techniques is vital when learning how to make flaky croissants at home. After completing the lamination process with the initial folds, you might wonder about the best methods to enhance those layers further. The classic technique involves both the book fold and the letter fold, both of which are crucial for creating that desired flaky texture.
The book fold entails rolling your dough into a rectangle and then folding it in half, akin to closing a book. This folding technique creates multiple layers, which are essential for achieving that airy, flaky texture that croissants are known for. Alternatively, the letter fold is executed by folding one side of the dough to the center and then bringing the other side over, similar to closing a letter. Both methods effectively build those signature flaky layers that make croissants irresistible.
Always remember to chill the dough between each fold to maintain the firmness of the butter. If you sense the dough getting too warm at any point, return it to the fridge for a short while. The ideal temperature for laminating dough is cold, allowing the butter to remain solid and not blend into the dough. While the folding technique is paramount, the quality of your butter and dough cannot be overlooked. Using high-fat, quality butter will yield the best results, ensuring your croissants turn out perfectly flaky and delicious.
Shaping Croissants for Optimum Baking Results
Cutting the Dough into Triangles for Precise Croissant Shaping
Shaping is where your efforts in making flaky croissants at home truly begin to take form. After completing the final fold and chilling your dough, it’s time to cut it into triangles. Begin by rolling your dough out into a rectangle about 1/4 inch thick, ensuring you maintain the integrity of the layered structure you’ve worked so hard to create.
Using a sharp knife or a pizza cutter, slice the dough into long triangles, ensuring that the base of each triangle measures approximately four inches wide. Your cuts must be clean and precise, as uneven pieces can result in irregularly shaped croissants during the baking process, affecting both their appearance and texture.
This step is critical; the triangle shape will directly affect how the croissants rise and bake in the oven. Aim for uniform triangles to ensure that each croissant rises evenly, providing a delightful and consistent texture. When cutting, take care not to squash the layers of dough, as this will impact the final texture of your pastries, and could lead to disappointing results.
Once your triangles are cut, you can proceed to the next exciting stage: forming the iconic croissant shapes that are beloved by many around the world.
Forming Croissant Shapes for Enhanced Aesthetic Appeal
The shaping process is when your croissants begin to resemble the iconic pastries known for their flaky layers. Take each triangle and gently stretch it slightly at the base. This action will help create a more pronounced curve when rolled, contributing to the final presentation of your croissants.
Starting at the wide end of the triangle, begin rolling the dough towards the pointed tip, keeping it tight but not overly so. As you roll, consider the tightness of your croissant; tighter rolls yield denser croissants, while looser rolls create a more airy texture that is often preferred by those who enjoy a lighter pastry.
Upon reaching the tip of the triangle, pinch it gently to seal the croissant. This step is essential to prevent it from unrolling during the baking process, ensuring that your hard work pays off with beautifully shaped croissants. Place each formed croissant on a baking tray lined with parchment paper, leaving ample space between each croissant to allow for expansion during the second rise.
If you wish to add an artistic flair, gently curve the ends of the croissants to create that classic crescent shape. This visual appeal is what makes croissants so enticing and recognizable. After shaping, cover the tray with a clean kitchen towel and allow the croissants to rise for about 1 hour or until they have puffed up significantly, setting the stage for a delightful baking experience.
The Second Rise: Enhancing Texture and Flavor Depth
The second rise is perhaps one of the most transformative phases in making flaky croissants at home. After shaping your croissants, allowing them to rest and rise again is crucial. This step significantly enhances the texture and flavor of your final product, creating a pastry that is both satisfying and delightful.
Ensure your kitchen is warm; a temperature range of 24-27 degrees Celsius is ideal for optimal rising conditions. If you are in a cooler environment, consider placing the tray in a preheated oven that you turn off. This creates a warm space for the croissants to rise without risking cooking them prematurely.
Allow the croissants to rise until they double in size—this typically takes 45 minutes to an hour. You’ll know they’re ready when they appear puffy and airy. This rise is critical; during this time, the yeast continues to work its magic, adding volume and lightness to your croissants, making them irresistibly tempting to anyone who catches a whiff of their delicious aroma.
Once the croissants have risen adequately, you are on the brink of baking them. This transformative step will turn your carefully crafted dough into golden, flaky pastries that will delight your senses and impress your guests.
Expert Baking Techniques for Achieving Flawless Croissants
Preheating the Oven for Optimal Croissant Baking
The moment has arrived to bring your croissants to life in the oven! Preheating your oven is a vital step in making flaky croissants at home. Aim for an oven temperature of around 200-220 degrees Celsius. This high heat is essential for achieving that perfect golden crust that all croissant enthusiasts crave and expect.
Before placing your croissants inside the oven, ensure it has fully preheated. An oven thermometer can be incredibly useful for ensuring the temperature is accurate. If your oven tends to run hot or cold, adjust accordingly; an uneven temperature can lead to undercooked or burnt croissants, which is far from ideal for your baking efforts.
Additionally, consider utilizing a baking stone or a tray placed in the oven while it preheats. This will help retain heat and create an even baking surface, significantly enhancing the final texture of your croissants. As you prepare to bake, ensure the oven rack is positioned in the middle for optimal heat circulation, ensuring even baking throughout.
Applying Egg Wash for a Beautiful Golden Finish
Applying an egg wash is a crucial step that elevates the appearance of your croissants and enhances their flavor profile. In a small bowl, whisk together one egg with a splash of milk or water until the mixture is smooth and well combined. When baked, this egg wash will impart a beautiful golden sheen to your croissants, making them visually appealing and enticing.
Using a pastry brush, gently apply the egg wash over the tops of the croissants, being careful not to drench them. A light coat is all that’s required to achieve that shiny finish that everyone loves. This step not only adds visual appeal but also helps lock in moisture, ensuring your croissants remain tender and flaky throughout the baking process.
Avoid getting the egg wash on the edges of the pastries, as this can inhibit them from rising effectively. If desired, sprinkle sesame or poppy seeds on top of the egg wash for added texture and flavor, enhancing the overall experience of enjoying your freshly baked croissants. The egg wash is your final touch before baking, so take your time to ensure a thorough and careful application for the best results.
Perfecting Baking Time and Temperature for Croissants
The baking time for your croissants is crucial to achieving that perfect flaky texture everyone loves. Bake your croissants in the preheated oven for approximately 15 to 20 minutes, keeping a close eye on them as they near the end of the baking time. They should puff up beautifully and develop a deep, golden color that indicates they are done, providing the perfect visual cue to their readiness.
If you notice that the tops are browning too quickly, you can tent them with aluminum foil to prevent them from burning while allowing the insides to cook through. The ultimate goal is to achieve that irresistible golden crust while ensuring the inside is fully cooked and deliciously flaky, making each bite a delight.
Once baked, remove the croissants from the oven and cool them on a wire rack. This cooling process helps maintain their crispiness and prevents steam from making the bottoms soggy, ensuring that your croissants remain just as delightful as when they first came out of the oven. The delightful aroma that fills your kitchen during this time is a testament to your hard work—nothing compares to the enticing smell of fresh croissants baking to perfection.
Preparing the Dough for Success in Croissant Baking
Effective dough preparation lays the groundwork for making flaky croissants at home. The process begins with ensuring all ingredients are